Writing Up Your PhD Thesis
Table of Contents
It’s an important step in most graduate students’ life: starting to write up the PhD thesis. This article shares a few best practices that I found helpful when I faced that task last year. The tips here might also be helpful for young graduate students, as the thesis writeup is eventually greatly simplified if early on in your career you for example already settle on a naming convention for citations.
I pushed the sources of my thesis to Github, removing most of the content and replacing it with placeholders. Feel free to base your thesis writeup on this code.
Tools #
Besides LaTeX there are a few essential tools and packages that I appreciated when writing up my thesis. Here’s a partial list of the most important ones. If you don’t know these tools then go and read up on them.
- git: in order to keep track of the changes to your LaTeX sources you should use a versioning system, git is a great choice.
- biblatex: makes citing
papers in your thesis a breeze. As an example you can use
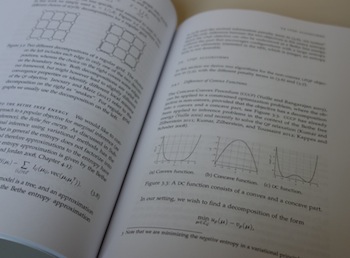
\parencite{Author2013}to cite a paper, or alternatively\textcite{Author2013}to include the authors in normal text and only put the year of the publication in brackets. You might also want to try biber in combination with biblatex. - PGF/TikZ and pgfplots: I created all the plots and illustrations in my thesis using pgf/tikz and pgfplots. It is rather time consuming, but the results look great. Furthermore, as you code your illustrations directly in an editor, you get versioning for free. Also, I highly recommend writing out plots data as CSV files, so that you could regenerate the plots also in 20 years from now.
- Make and latexmk: I use make and latexmk to automate the build of the PDF from the LaTeX sources. This saves typing in the console, but also has the added benefit that you’ll never forget how to rebuild your thesis.
- Koma script and classicthesis: Classicthesis is a pretty nice-looking style for your thesis. In case you don’t like it, I’d go for the Koma script documentclass.
Naming Conventions #
As one of the first steps I would settle on a style guide which defines a few
naming conventions for the labels of formulas, sections or citations. Otherwise
you’ll get random clashes and inconsistencies when importing the sources of some of your
early papers. I
generally use \label{type:chaptername:id} for all the LaTeX labels.
Here type is any of fig, sec or eq; chaptername is a
unique label for the a chapter, e.g. background (don’t use chapterx, as the
order might change!). Finally, id is an
identifier such as gibbs_distribution. For citation labels I use
Firstauthor2013, in case an author published several articles,
just append an a,b,c etc.
Directory Layout #
For the directory structure I followed largely what the classicthesis package suggests:
- A
chapterssubfolder. Each chapter gets its own folder in there. All the content relevant for a chapter, goes into this folder. This includes the LaTeX sources and images, but also data needed to generate the plots. - A
frontbackmatterfolder storing various tex files for the front and back matter. This includes the title page, acknowledgments, the bibliography, the notation or the index.
The main document will in the end simply consist of a few input
commands.
Importing Your Papers #
Finally, after setting up the document, it’s time to import the content. I simply
moved the tex sources of the papers I wanted to discuss into the corresponding
subfolders. Then you need to get rid of all the preamble instructions. It is
generally a good practice to use a \def\dir{frontbackmatter} and
prepend any includegraphics and input command in
your sources by the \dir command. Like this you could later on
rename a chapter folder and only have to adapt the define command, instead of
replacing every path in the tex sources.
As a second step, I would modify all the labels and citations to obey your style guides and
move all the references into a dedicated references.bib file.
Printing #
Most universities provide some form of print service. At ETH Zurich it is for example the Druckzentrum ETH. Printing the thesis through the university is probably the easiest and cheapest solution.
I decided to use a print-on-demand (POD) services instead, in my case I chose Lulu. With a POD service you can choose from many formats and covers and can easily print the thesis in several batches (in case your thesis turns out to be really popular). A black-and-white copy of my thesis (around 180 pages) amounts to around 8 Euros. A pretty decent price in my opinion. If you want a color print of your thesis it however gets quite expensive, as there is no option to only print individual pages in color.
I chose the Crown Quarto paper size (18,0cm x 24,6cm) the code below shows how to adapt the geometry of the page from within LaTeX to match the Crown Quarto specifications.
% define page size and margins for the final print
\usepackage{geometry}
\geometry{paperwidth=18.91cm,paperheight=24.589cm,
bindingoffset=0.89cm, % gutter
inner=2cm, % inside margin
outer=4cm, % outside margin
vmargin=2.5cm, % top and bottom margins
marginparsep=0.6cm,
marginparwidth=3cm,
}